Contributing to Jupyter Notebook#
Thanks for contributing to Jupyter Notebook!
Make sure to follow Project Jupyter’s Code of Conduct for a friendly and welcoming collaborative environment.
Setting up a development environment#
Note: You will need NodeJS to build the extension package.
The jlpm command is Jupyter’s pinned version of yarn that is installed with Jupyter Builder. You may use
yarn or npm in lieu of jlpm below.
Note: we recommend using mamba to speed up the creation of the environment.
# create a new environment
mamba create -n notebook -c conda-forge python nodejs -y

# activate the environment
mamba activate notebook

# Install package in development mode
pip install -e ".[dev,docs,test]"

# Install dependencies and build packages
jlpm
jlpm build

# Link the notebook extension and @jupyter-notebook schemas
jlpm develop

# Enable the server extension
jupyter server extension enable notebook
notebook follows a monorepo structure. To build all the packages at once:
jlpm build
There is also a watch script to watch for changes and rebuild the app automatically:
jlpm watch
To make sure the notebook server extension is installed:
$ jupyter server extension list
Config dir: /home/username/.jupyter

Config dir: /home/username/miniforge3/envs/notebook/etc/jupyter
    jupyterlab enabled
    - Validating jupyterlab...
      jupyterlab 3.0.0 OK
    notebook enabled
    - Validating notebook...
      notebook 7.0.0a0 OK

Config dir: /usr/local/etc/jupyter
Then start Jupyter Notebook with:
jupyter notebook
Local changes in Notebook dependencies#
The development installation described above fetches JavaScript dependencies from npm,
according to the versions in the package.json file.
However, it is sometimes useful to be able to test changes in Notebook, with dependencies (e.g. @jupyterlab packages) that have not yet
been published.
yalc can help you use local JavaScript packages when building Notebook, acting as a local package repository.
Install yalc globally in your environment:
npm install -g yalcPublish your dependency package:
yalc publish, from the package root directory.
For instance, if you are developing on @jupyterlab/ui-components, this command must be executed from path_to_jupyterlab/packages/ui-components.Depend on this local repository in Notebook:
from the Notebook root directory:
yalc add your_package: this will create a dependencies entry in the main package.json file.
With the previous example, it would beyalc add @jupyterlab/ui-components.Notebook is a monorepo, so we want this dependency to be ‘linked’ as a resolution (for all sub-packages) instead of a dependency.
The easiest way is to manually move the new entry in package.json from dependencies to resolutions.Build Notebook with the local dependency:
jlpm install && jlpm build
Changes in the dependency must then be built and pushed using jlpm build && yalc push (from the package root directory),
and fetched from Notebook using yarn install.
Warning: you need to make sure that the dependencies of Notebook and the local package match correctly,
otherwise there will be errors with webpack during build.
In the previous example, both @jupyterlab/ui-components and Notebook depend on @jupyterlab/coreutils. We
strongly advise you to depend on the same version.
Running Tests#
To run the tests:
jlpm run build:test
jlpm run test
There are also end to end tests to cover higher level user interactions, located in the ui-tests folder. To run these tests:
cd ui-tests
#install required packages for jlpm
jlpm

#install playwright
jlpm playwright install

# start a new Jupyter server in a terminal
jlpm start

# in a new terminal, run the tests
jlpm test
The test script calls the Playwright test runner. You can pass additional arguments to playwright by appending parameters to the command. For example to run the test in headed mode, jlpm test --headed.
Check out the Playwright Command Line Reference for more information about the available command line options.
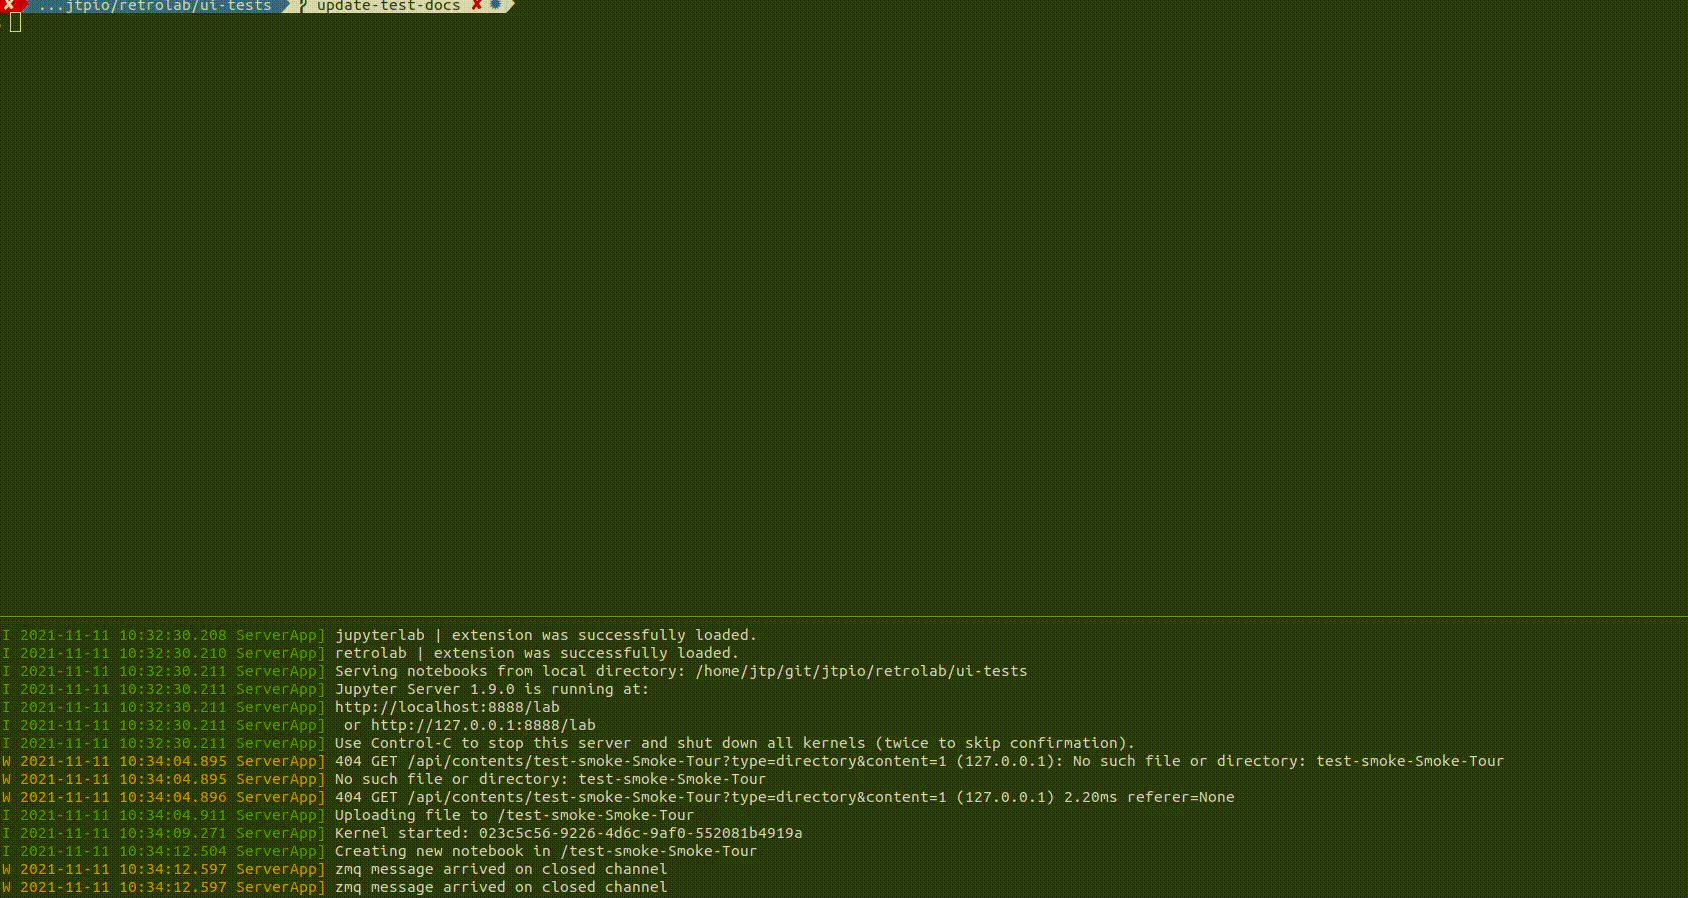
Running the end to end tests in headful mode will trigger something like the following:
Updating reference snapshots#
Often a PR might make changes to the user interface, which can cause the visual regression tests to fail.
If you want to update the reference snapshots while working on a PR you can post the following sentence as a GitHub comment:
bot please update playwright snapshots
This will trigger a GitHub Action that will run the UI tests automatically and push new commits to the branch if the reference snapshots have changed.
Code Styling#
All non-python source code is formatted using prettier and python source code is formatted using black.
When code is modified and committed, all staged files will be
automatically formatted using pre-commit git hooks (with help from
pre-commit. The benefit of
using code formatters like prettier and black is that it removes the topic of
code style from the conversation when reviewing pull requests, thereby
speeding up the review process.
As long as your code is valid,
the pre-commit hook should take care of how it should look.
pre-commit and its associated hooks will automatically be installed when
you run pip install -e ".[dev,test]"
To install pre-commit manually, run the following:
pip install pre-commit
pre-commit install
You can invoke the pre-commit hook by hand at any time with:
pre-commit run
which should run any autoformatting on your code and tell you about any errors it couldn’t fix automatically. You may also install black integration into your text editor to format code automatically.
If you have already committed files before setting up the pre-commit
hook with pre-commit install, you can fix everything up using
pre-commit run --all-files. You need to make the fixing commit
yourself after that.
You may also use the prettier npm script (e.g. npm run prettier or
yarn prettier or jlpm prettier) to format the entire code base.
We recommend installing a prettier extension for your code editor and
configuring it to format your code with a keyboard shortcut, or
automatically on save.
Some of the hooks only run on CI by default, but you can invoke them by
running with the --hook-stage manual argument.
Documentation#
First make sure you have set up a development environment as described above.
Then run the following command to build the docs:
hatch run docs:build
In a separate terminal window, run the following command to serve the documentation:
hatch run docs:serve
Now open a web browser and navigate to http://localhost:8000 to access the documentation.
Contributing from the browser#
Alternatively you can also contribute to Jupyter Notebook without setting up a local environment, directly from a web browser:
GitHub CodeSpaces is directly integrated into GitHub. This repository uses the pixi package manager to set up the development environment. To contribute after the Codespace is started:
Run
pixi shellin a terminal to activate the development environmentUse the commands above for building the extension and running the tests, for example:
jlpm buildTo start the application:
pixi run start. A popup should appear with a button to open the Jupyter Notebook in a new browser tab. If the popup does not appear, you can navigate to the “Forwarded ports” panel to find the URL to the application.
GitHub’s built-in editor is suitable for contributing small fixes.
A more advanced github.dev editor can be accessed by pressing the dot (.) key while in the Jupyter Notebook GitHub repository